I can’t be stopped – I constantly want to try new things, and sometimes I can’t sleep at night because I’m just mulling a new process over and over in my head. The only cure is to do it, and so I’ve decided to invest a little bit into edge painting some work so I can offer it as a new service at Panthera Press. Here is my first experiment – a more detailed tutorial will come sometime next week, because I actually have a small job where I’ll be doing this for real. So here is what I learned so that you too may put it into action:
1. The setup: Here you can see my price breakdown. I put a lot of effort into finding the best prices and the most appropriate equipment. I always choose items with free shipping (many are Prime on Amazon), and some of the things like the Acrylics and the clamps, I already had but have added into the total cost anwyay. I’m also going to list and link each item I purchased so if you want to set up like I have, you can:
Total Cost: 224.34
Compressor with Air Tank (89.99): I made a point of asking some questions on an airbrush forum and it was suggested I spend a bit more to get a compressor with an air tank – this reduces how hard the compressor has to work, and it ensure a more even airflow. This is a middle of the road item. For true air brushers an industrial compressor (requires an adaptor for airbrushing) or one with two air tanks is suggested.
Master Airbrush with 3 needles and hose (29.99): I chose this dual action airbrush because dual action gives you control over paint flow as you’re painting (vs. single action which you must adjust at the nozzle). Likewise this one has a knob on the back that lets you set a maximum paintflow and gives you a little more control. The .3mm needle was perfect for what I needed, but the .5mm could be used for thicker paint, and the .2mm for more detail.
Golden Paint 16 Fluid Acrylic Set (36.00): I bought this a long time ago on sale and I don’t think they sell this awesome set anymore so I’ve linked something similar – it’s not airbrush paint, but golden high flow paints are often used with airbrushes, and I really liked the bronze gold I bought separately. Airbrush paints come in bigger bottles – but they are already thinned so the price is comparable and may even be a better value.
Cleaning Pot (15.00): You probably don’t need this, but it does make it easier to change colors and clean the airbrush without spraying everywhere. This one was ok – it leaked when I used it, but I’m not sure I had the lid screwed on perfectly. You may want to buy the brand name version on Amazon.
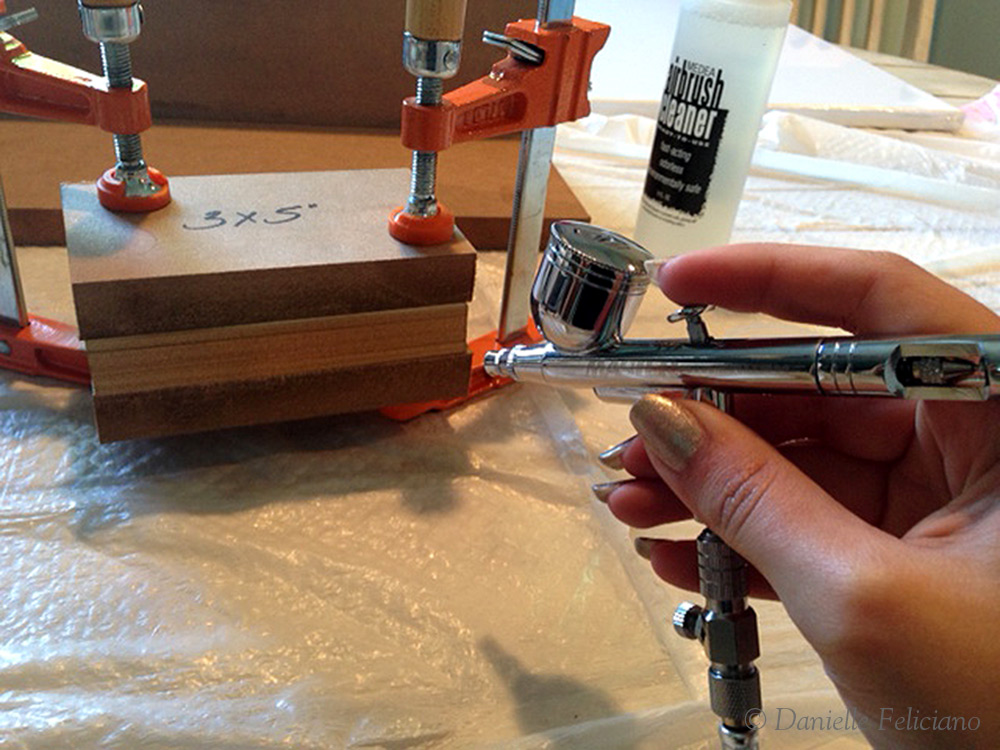
Bar Clamps (12.99 e): Buy tall clamps so you can get a larger stack, these worked fine and I use them for many other things as well.
MDF Shelving (7.00): I bought a sheet of thick MDF and cut it down on my table saw to a variety of standard sizes like 4×6 and 5×7″, you want to cut them a little smaller than the card size, because if the edges stick out over the cards too much, it’s harder to spray up near the top and bottom. I also made a cradle for ‘padding’ the cards (getting them into a nice even stack).
Cake Turntable (7.00 on sale): I used a coupon (they have them every week) at Michaels to get a cake turn-table. This helped me rotate the stack to get all sides. I’ve linked the one I purchased on Amazon.
Cleaning Solution (5.99): Self explanatory. It works great on the dried up acrylic, better than trying to use just water, you need this.
Transparent Base (6.39): Helps with the flow of the paint, and helps thin somewhat, though a little water is needed too. Worth buying, thinning with just water or a homemade solution like windex or alcohol requires some experimenting and can cause the paint to separate or not flow properly.

2. Mixing the Paint: I tested this setup at my house, and was pretty happy with everything I bought. The compressor isn’t too loud and it stays nice and still (no shaking). The airbrush worked beautifully and was equally easy to set up and clean (read the manual to clean it, I ended up disassembling more than needed haha!)
So, regarding the mix – these are thinner acrylics so they didn’t need too much thinning. First I did a 1 to 1 ratio of paint and the transparent base. Then I added a little bit of water to thin it to milk consistency. Don’t add too much water to heavy body acrylics at once or it will get blobby and chunky, go little by little to get a thin, smooth milky texture. The transparent base did not dilute the beauty of this gold pigment – it’s Golden Acrylic’s Fluid Acrylics Bronze Gold that I picked up at Michael’s. I used about three times this amount during the experiment to spray three 1-3″ stacks or so of cards.


3. Clamping the Cards: I can’t stress how nice it was to have these pre-cut boards. If you don’t have pre cut boards, you will have to line up two edges at a time, then un-clamp and re clamp the other side. With these little boards, you can just rotate the whole thing around and do all four sides in one go. I used a cradle I built to get them nice and square – good cutting is essential, but I found that if your cutting is a little ragged you can still make it work by doing two sides at once (making sure those two edges are flush and flat) then un-clamping and re-stacking/padding/flushing the stack so that the other two sides are flush.


I used two clamps, and did my best to make sure I’d be able to spray around them well.
4. Spraying: This part, I’ll go into more detail next tutorial, but it was pretty easy really. Just add some of the paint mixture to the airbrush cup, replace the lid, turn on the compressor and wait for it to reach the proper PSI (this model has an auto shutoff where it will fill the airtank, shut off, and come back on when the PSI drops too low). Then you just press down on the trigger and pull back to release more paint. I did light coats from about 6″ away.

At this point I hadn’t bought the lazy susan/ turntable yet, so I just had to rotate the stacks myself, the turntable will make this easier for sure.

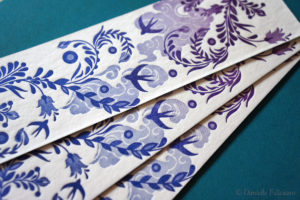
Angling the cards against the cradle made it easier to get all the edges. I did a few coats – and I’d say I laid it on relatively thick. Despite this, the cards hardly stuck together at all (no damage or bleeding on any of the internal cards, even though I thinned the paint with some water and it was very liquid). They were easily separated, even when I left the stack to completely dry and came back later. The paint also dried quickly so I could separate them only a minute or two after I was done spraying.
Conclusion: This was much easier than expected, even though I don’t have great control of the trigger yet, if you just keep doing light coats you’ll get the even coat you need. Even with heavy spray the gold didn’t bleed (make sure you clamp the cards super tight!), and every card came out lovely, with sparking gold edges. This is 300gsm Crane Lettra, and next week I’m going to try it with the 600gsm and a non metallic color.
There are lots of kits available like this one for 180.00, which sell much of what you need in one nice set. However, I think I made a good choice for myself. I liked the Golden Acrylic colors better than the airbrush paints with the kit I’ve linked, and the airbrush I bought has multiple needle sizes and a flow adjustment knob on the back. Likewise, because I had some of this on hand, parting this out was cheaper for me. You don’t need airbrush paints if you buy the thinner – you can use watercolors or acrylics you already have – even those super cheap $1.00 ones in the craft section work very nicely and can be mixed with some gloss or matte medium.
I hope this will be helpful for someone, happy printing!
Danielle, thanks for posting all these awesome tutorials! I’m currently an amateur trying to learn some techniques, so they are very useful. Thank you!
Wow! This is so incredibly helpful. Thank you so much for sharing such a detailed post. I tested out acrylic paint for edge painting this weekend with a simple sponge brush … But it wasn’t very good. Im going to order everything you suggested and get going on this as soon as possible!!
*landed*
i am here, because i watched your video about edge painting on youtube, i was confused about painting an edge of my wedding invitation card, but then i found your video. . . yesss, everythings clear !!
I’m looking for this just about 3 days long, and this is the answer !! OMG !!
Thank you so much
*fly away*
This is so helpful!!! Thank you.
Reblogged this on Do It Together Paperie.